Difference between revisions of "Devil's Catacomb"
| [checked revision] | [checked revision] |
(Created page with "{| width="100%" style="font-size:0.9em; line-height:1em;" {|width="100%" style="background:#5d0505;" |align="center"| 784xpx |} |} {{Area/Layou...") |
m (Bot: Adding ae, nl, pt, ro; modifying cz) |
||
| (10 intermediate revisions by 3 users not shown) | |||
| Line 1: | Line 1: | ||
| − | { | + | {{Area/LayoutV2 |
| − | { | ||
| − | |||
| − | |||
| − | |||
| − | |||
| + | |Logo = devilscatacomb | ||
| − | + | |Empire= Neutral | |
| − | | | + | |Description = |
| − | + | * You can enter the Devil's Catacomb from level 75, after you have succesfully finished atleast one [[Demon Tower]] run. | |
| − | + | * You have 1 hour to pass the dungeon. After that, you need to wait 30 more min to re-enter it. | |
| − | + | * Devil's Catacomb is especially well known for gathering rank points from levels 75-85. | |
| − | + | * Devil's Catacomb launched as beta October 6 2012. | |
| − | * You can enter the Devil's Catacomb from level 75, after you have succesfully finished atleast one [[ | ||
| − | * You have 1 hour to pass the dungeon. After that, you need to wait 30 more min to re-enter it | ||
| − | * Devil's Catacomb is especially well known for gathering rank points from levels 75-85 | ||
| − | * Devil's Catacomb launched as beta October 6 2012 | ||
| Line 27: | Line 19: | ||
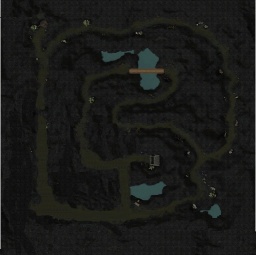
| − | To pass level 1, you must drop the | + | To pass level 1, you must drop the {{Ti|px=19|Soul Crystal Key}}. In case you are in a group, only 1 key is needed. That needs to be delivered to the [[Kud Statue]] |
| − | :<small>'''''Monsters:'''''</small> [[ | + | :<small>'''''Monsters:'''''</small> [[Hell Hound]], [[Hell Officer]], [[Jellyfish of Hell]], [[Hell Guard]], [[Zombie]] |
| Line 34: | Line 26: | ||
| − | You must fight your way through the [[ | + | You must fight your way through the [[Gate of Perdition]] until you reach the [[Tortoise Rock]]. To pass, all group members need to have a {{Ti|px=19|Shrunken Head}} |
| − | :<small>'''''Monsters:'''''</small> [[ | + | :<small>'''''Monsters:'''''</small> [[Infernal Claw]], [[Hell Hound]], [[Hell Officer]], [[Hell Guard]], [[Gate of Perdition]], [[Zombie]], [[Double-head Hell Archer]] |
| Line 42: | Line 34: | ||
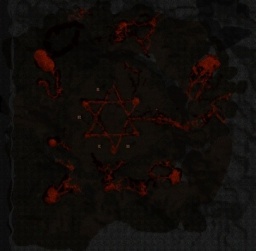
In this floor you find 7 metinstones, but only 2 of them are real. They need to be smashed in order to proceed to the next level. | In this floor you find 7 metinstones, but only 2 of them are real. They need to be smashed in order to proceed to the next level. | ||
| − | :<small>'''''Monsters:'''''</small> [[ | + | :<small>'''''Monsters:'''''</small> [[Hell Archer]], [[Hell Warrior]], [[Hell Spearman]], [[Metin of Retaliation]] |
| Line 50: | Line 42: | ||
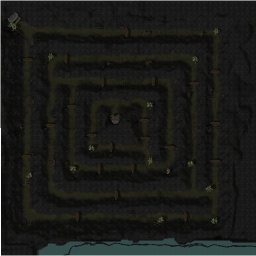
Here you need to find your way through a thick maze. There are 5 different ways. | Here you need to find your way through a thick maze. There are 5 different ways. | ||
When one of the group members has found the way, he has to click the runestone. | When one of the group members has found the way, he has to click the runestone. | ||
| − | :<small>'''''Monsters:'''''</small> [[ | + | :<small>'''''Monsters:'''''</small> [[Hell Archer]], [[Hell Warrior]], [[Hell Spearman]], [[Hell Priest]], [[Hell Major]], [[Hell Slaughterer]] |
{{{!}} | {{{!}} | ||
{{!}}[[File:Cata1.jpg|200px|thumb|Possibility 1]] | {{!}}[[File:Cata1.jpg|200px|thumb|Possibility 1]] | ||
{{!}}[[File:Cata2.png|200px|thumb|Possibility 2]] | {{!}}[[File:Cata2.png|200px|thumb|Possibility 2]] | ||
| + | {{!-}} | ||
{{!}}[[File:Cata3.png|200px|thumb|Possibility 3]] | {{!}}[[File:Cata3.png|200px|thumb|Possibility 3]] | ||
| + | {{!}}[[File:Cata4.png|200px|thumb|Possibility 4]] | ||
{{!-}} | {{!-}} | ||
| − | |||
{{!}}[[File:Cata5.jpg|200px|thumb|Possibility 5]] | {{!}}[[File:Cata5.jpg|200px|thumb|Possibility 5]] | ||
| + | {{!}}[[File:Cata6.png|200px|thumb|Possibility 6]] | ||
{{!}}} | {{!}}} | ||
| Line 65: | Line 59: | ||
| − | Find and kill [[Tartaros]], he is in one of the rooms beneath the temple. After he has dropped the | + | Find and kill [[Tartaros]], he is in one of the rooms beneath the temple. After he has dropped the {{Ti|px=19|Grimace Totem}} bring it to the [[Basalt Obelisk]] and drag it on there. |
| − | :<small>'''''Monsters:'''''</small> [[ | + | :<small>'''''Monsters:'''''</small> [[Hell Archer]], [[Hell Warrior]], [[Hell Spearman]], [[Hell Priest]], [[Hell Major]], [[Hell Slaughterer]], '''[[Tartaros]]''' |
| Line 73: | Line 67: | ||
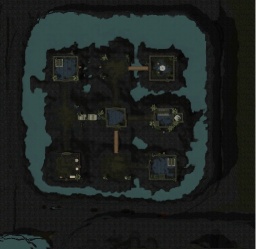
Kill all the monsters on this floor, then, focus on [[Charon]]. After all the monsters have been defeated, you will move on to the next level. | Kill all the monsters on this floor, then, focus on [[Charon]]. After all the monsters have been defeated, you will move on to the next level. | ||
| − | :<small>'''''Monsters:'''''</small> [[ | + | :<small>'''''Monsters:'''''</small> [[Hell Archer]], [[Hell Warrior]], [[Hell Spearman]], [[Hell Priest]], [[Hell Major]], [[Hell Slaughterer]], '''[[Charon]]''', '''[[Erebos]]''' |
| Line 79: | Line 73: | ||
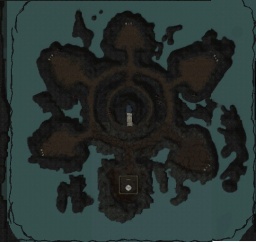
| − | Kill all the monsters in the boss chamber before you focus on killing [[ | + | Kill all the monsters in the boss chamber before you focus on killing [[Azrael]]. After killing him, you will be teleported to the Devil's Catacomb Portal. |
| − | :<small>'''''Monsters:'''''</small> [[ | + | :<small>'''''Monsters:'''''</small> [[Azrael's Spawn]], [[Hell Archer]], [[Hell Warrior]], [[Hell Spearman]], [[Hell Priest]], [[Hell Major]], [[Hell Slaughterer]], [[Hell General]], '''[[Azrael]]''' |
| − | |||
| − | |||
| − | |||
| − | |||
|Areas= | |Areas= | ||
| − | + | *[[Hwang Temple]] | |
| − | * [[Hwang Temple]] | ||
| − | |||
| − | |||
| − | |||
| − | |||
|Old Man= | |Old Man= | ||
| − | |||
| − | |||
|Teleporter= | |Teleporter= | ||
| − | |||
| − | |||
|Ores= | |Ores= | ||
| + | |Metins = | ||
| + | *[[Metin of Retaliation]] | ||
| − | + | |NPC = | |
| − | | | ||
| − | |||
| − | |||
| − | |||
| − | |||
| − | |||
| − | |||
*[[Basalt Obelisk]] | *[[Basalt Obelisk]] | ||
| − | *[[ | + | *[[Tortoise Rock]] |
| − | *[[Statue | + | *[[Kud Statue]] |
| + | |Monster = | ||
| + | *[[Azrael's Spawn]] | ||
| + | *[[Double-head Hell Archer]] | ||
| + | *[[Evil Hell Archer]] | ||
| + | *[[Evil Hell General]] | ||
| + | *[[Evil Hell Major]] | ||
| + | *[[Evil Hell Priest]] | ||
| + | *[[Evil Hell Slaughterer]] | ||
| + | *[[Evil Hell Spearman]] | ||
| + | *[[Evil Hell Warrior]] | ||
| + | *[[Gate of Perdition]] | ||
| + | *[[Hell Archer]] | ||
| + | *[[Hell General]] | ||
| + | *[[Hell Guard]] | ||
| + | *[[Hell Hound]] | ||
| + | *[[Hell Major]] | ||
| + | *[[Hell Officer]] | ||
| + | *[[Hell Priest]] | ||
| + | *[[Hell Slaughterer]] | ||
| + | *[[Hell Spearman]] | ||
| + | *[[Hell Warrior]] | ||
| + | *[[Infernal Claw]] | ||
| + | *[[Jellyfish of Hell]] | ||
| + | *[[Zombie]] | ||
| + | *'''[[Azrael]]''' | ||
| + | *'''[[Charon]]''' | ||
| + | *'''[[Erebos]]''' | ||
| + | *'''[[Tartaros]]''' | ||
| − | | | + | |Map = |
| + | '''"Level 1"'''<br> | ||
| + | [[File:Devil's Catacomb 1.jpg|256px|link=]]<br><br> | ||
| + | '''"Level 2"'''<br> | ||
| + | [[File:Devil's Catacomb 2.jpg|256px|link=]]<br><br> | ||
| + | '''"Level 3"'''<br> | ||
| + | [[File:Devil's Catacomb 3.jpg|256px|link=]]<br><br> | ||
| + | '''"Level 4"'''<br> | ||
| + | [[File:Devil's Catacomb 4.jpg|256px|link=]]<br><br> | ||
| + | '''"Level 5"'''<br> | ||
| + | [[File:Devil's Catacomb 5.jpg|256px|link=]]<br><br> | ||
| + | '''"Level 6"'''<br> | ||
| + | [[File:Devil's Catacomb 6.jpg|256px|link=]]<br><br> | ||
| + | '''"Level 7"'''<br> | ||
| + | [[File:Devil's Catacomb 7.jpg|link=]]<br><br> | ||
| + | |Map-1 = | ||
| + | |Map-1-title = | ||
| + | |Map-2 = | ||
| + | |Map-2-title = | ||
| − | + | }} | |
| − | + | [[ae:سرداب الموتى]] | |
| − | + | [[cz:Ďáblova katakomba]] | |
| − | + | [[de:The Devil's Catacomb]] | |
| − | + | [[es:Catacumbas de demonio]] | |
| − | + | [[fr:Catacombes du Diable]] | |
| − | + | [[gr:The Devil's Catacomb]] | |
| − | + | [[hu:Az Ördög katakombája]] | |
| − | + | [[it:Catacombe del Diavolo]] | |
| − | + | [[nl:De Duivelse Catacombe]] | |
| − | + | [[pl:Piekielne Katakumby]] | |
| − | + | [[pt:Catacumbas do Demónio]] | |
| − | + | [[ro:Catacomba Diavolului]] | |
| − | + | [[tr:Şeytan Katakombu]] | |
| − | |||
| − | |||
| − | |||
| − | |||
| − | |||
| − | |||
| − | |||
| − | |||
| − | |||
| − | |||
| − | |||
| − | |||
| − | |||
| − | |||
| − | |||
| − | |||
| − | |||
| − | |||
| − | |||
| − | |||
| − | |||
| − | |||
| − | |||
| − | |||
| − | |||
Revision as of 05:26, 8 January 2017

|
INFORMATION |
The Devil's Catacomb
|
Interactive Map
|
||||||||
| "Level 1"
|
||||||||||
|
||||||||||
| Other Information | ||||||
|
||||||
|
Adjacent areas
|
Old Man
|
Teleporter
|
||||
|
You cannot reach this area via the Old Man
|
You cannot reach this area via the Teleporter
|
|||||